
If you are not add captions in CapCut while editing in your videos, you are missing out on a large audience. Many users from a native language cannot pay attention to their audio. They just read the subtitles to understand the meaning. The problem is that they cannot understand your language and accent. In this way, if they find the caption unavailable, they leave your video. Adding subtitles to a video is a very simple and quick process. In this article, we will tell you how to add auto-captions and how to add captions in a video manually.
Table of Contents
What are Captions?
Captions are the lines of text which are displayed in a playing video. They provide the written version of spoken language. They are mostly used in movies to provide translation of the language for users who are not familiar with the film’s original language.
Why are Captions important?
Add captions in CapCut is so important because they make it easier to learn information from videos. It also helps to understand the lyrics in a video. Moreover, it also helps to learn the English language from the videos. People who do not have active listening skills learn a lot by reading captions. It is also used to provide additional information about that clip.
What is Auto Caption?
Auto captioning is a smart way to add text to your videos. Manually, it takes an hour to add a caption to a video. The CapCut app saves your hours by adding a CapCut auto caption feature. It auto-adds text to your videos according to your voice.
How to add Auto Captions in CapCut?
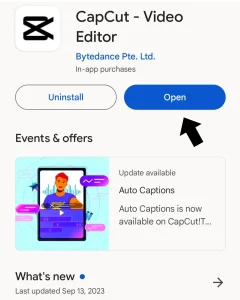
If you have a short time, these steps can help you quickly and easily add captions in CapCut while editing your videos. Before starting editing, you must have installed the latest CapCut version on your phone. Otherwise, you will not enjoy their latest features.
Here’s a step-by-step guide on how to use the auto caption feature in CapCut
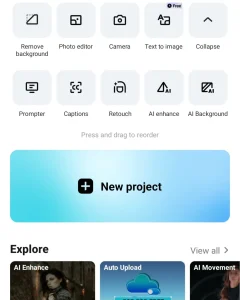
Step-1: Create a new project
- Download CapCut Apk and open it. The home interface is displayed on a screen.
- Click on a +new project button.
Step-2: Import your video
- Select the video in which you want to add a caption.
- Click on the “New Project” button in the right corner of the screen.

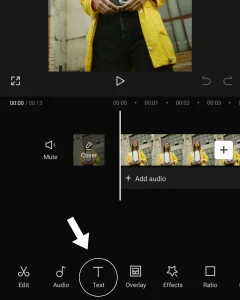
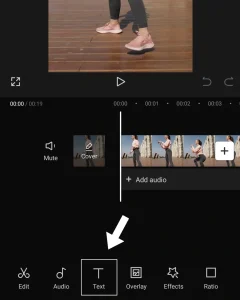
- Your video is added to a CapCut editing timeline.
- Click on the “text” menu in the bottom part of the screen.
Step-4: Click on auto caption
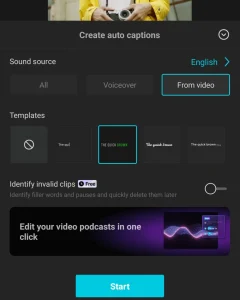
- After clicking on the Text menu, you will see the following options: Add Text, Caption, and Add Stickers.
- Click on the third option, auto caption.
- A small popup of auto-captions appears with default settings.

Step-5: Adjust the captions
- Now, see the look of the video with CapCut-generated captions.
- Click on batch editing, where you can see the timing of the caption.
- Click on the caption layer and adjust the place of text.
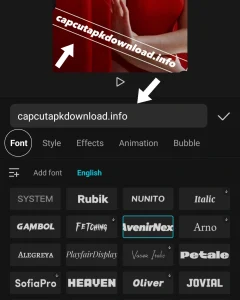
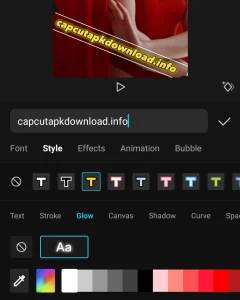
Step-6: Font setting
- Click on text from the layer and go to the style menu.
- There are various fonts available in different styles.
- You add different colors, shadows, and spacing in a text.

Step-7: Save your video
- Watch your whole video and make sure that you have successfully add captions in CapCut.
- Click on this (↑) in the top right corner of the screen.
- You can save your video in different resolutions.
- Export it on your device or share it directly on social media.

How to manually add captions in CapCut?
Auto add captions in CapCut only add text in English. Sometimes, auto-captions may not give accurate results. You can manually add captions in CapCut in any language, anywhere, according to your own will. Manual video editing in CapCut takes some time, but if you are creative, I prefer this method.
Step-1: Create a project
- Install and Open the CapCut app.
- Click on + new project button on the main screen.
Step-2: Add your files in a project
- Import your videos and audios in a project.
- Mark your desired files and click on the create video button in the lower right corner.

- Your files are added to CapCut editing timeline.
- Click on the text menu in the lower toolbar.

Step-4: Click on add text
- After clicking on the text menu.
- Click on add text menu.

Step-5: Add your text
- A small text box is open where you add text.
- Type your text in the box.
- You can change the font size, style, and colors.
Step-6: Adjust the caption
- Click on the caption layer where you can do text editing.
- Adjust the text duration where you want to display in the video.
Step-7: Save your video
- Finally you have add captions in CapCut and your video is ready to save.
- Click on the export (↑) icon in the right corner of the screen.

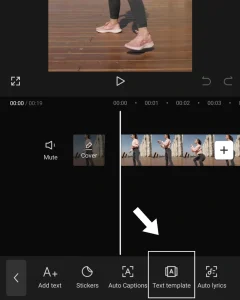
How to use text templates in CapCut?
CapCut provides pre-made text templates where you can add already-made animated text. It is an easy and quick process without manual editing. These templates come in different graphics for different purposes like an intro, conclusion, and other elements according to your video requirements. However you can add text on videos manually according to your videos. But recommended method is that always use the text templates to add captions in Capcut.
Step-1: Install and open CapCut
- Open the CapCut app.
- On the main screen, tap the + new project button.
Step-2: Add your video
- Select the video in which you add animated text.
- Click on the” create video” button in the lower right corner of the screen.

- Your video is inserted into the editing timeline.
- Click the” text menu” option in the toolbar at the bottom of the screen.
Step-4: Tap on text templates
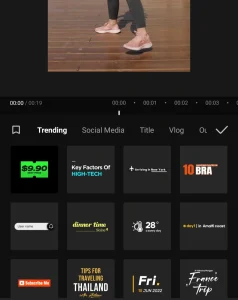
- Click on the” text templates” in the text menu.
- You will see a catalogue of ready-to-use text animations sorted into different categories.
- Click any one of them and replace the template text with your text.
- You can choose more than one animated text.
Step-5: Adjust the animated text
- Click on the text layer in the timeline.
- You can swap, move, and make other changes.
Step-6: Save your video
- Once you have finished editing, save your video.
- Click on the export”(↑)” icon in the top corner of the screen.

Tips to add captions in CapCut
There are a few basic tips to follow to add captions in CapCut.
Language
CapCut supports the world’s most spoken languages, English and many more. They make it easy to add subtitles in different languages. If you are making an international video, try to give subtitles in different languages. These things improve the user experience.
Plan the subtitle
You have to do some work in advance before adding a caption. Make a well-thought-out script and mark the places where you convey your message.
Keep short and basics.
Keep your caption lengths short. Do not use long sentences which are hard to read. Use short sentences that the user can understand and quickly read if you are making reels for instagram and TikTok videos. Just write the sweet words, not write the long stories that a normal user understands.
Fonts
Choose readable fonts mainly for mobile screens. Avoid decorative fonts. Use only simple and choose colors that are in contrast to the video visibility. Try to bold your sentences. You can use a drop shadow to stand out the text.
Pros and Cons
It is important to consider the good and bad of CapCut regarding caption adding. Here is a list of pros and cons.
Pros
- Simple to add.
- Multiple text customization option.
- Auto add captions in CapCut.
- Support multiple languages fonts.
Cons
- Generic look.
- Sometimes, auto caption doesn’t work.
- Languages are limited to auto-captions.
Watch the “Video tutorial” below to follow the steps mentioned above to add captions in CapCut..
FAQs
Q: Can I also edit the captions style in CapCut?
A: Absolutely Yes, CapCut allows you to edit the captions of your videos. CapCut provides a wide range of font styles and animation effects for the purpose of editing in captions.
Q: Can I add captions in foreign language?
A: Yes, CapCut offers multiple languages, including English, Chinese, Japanese, Korean, Spanish, French, German, and Portuguese.
Q: Can I add captions in CapCut to our already saved videos?
A: Yes, you can add captions in CapCut to your already saved video. Open CapCut and add your video to the timeline. Go to the Text menu and click on the auto captions.
Conclusion
The Capcut app is a top choice when adding captions to videos. Its user-friendly interface and helpful features make it easy to add captions in CapCut to videos precisely. It enhances the user experience, and users are thankful to you for providing text. If you are not a perfect editor, with some little practice, you can make amazing text boxes, descriptions, and brief statements.