
If you are exhausted by using old effects and filters of any video editing app and want to add transitions in CapCut apk. I have also faced these problems but don’t worry now. Transitions of CapCut are the perfect solution for this. You can make incredible videos by using the latest transition effects of CapCut. To Add transitions in CapCut is a cool and enjoyable editing process. In this article, we will guide you step by step on how you can add transitions in CapCut.
Table of Contents
- 1 What are Transitions?
- 2 Why to add Transitions in CapCut?
- 3 Types of transitions in CapCut
- 4 How to add transitions?
- 4.1 Step-1: Download CupCut apk
- 4.2 Step-2: Create a new project
- 4.3 Step-3: Add your video
- 4.4 Step-4: Split the video
- 4.5 Step-5: Select “|” icon
- 4.6 Step-6: Select the transition effect
- 4.7 Step-7: Adjust the intensity of the transition
- 4.8 Step-8: Apply transition to all video
- 4.9 Step-9: Multiple splitting
- 4.10 Step-10 Check the resolution of the video
- 4.11 Step-11: Export your video
- 5 How to add animated transitions in CapCut?
- 6 How to remove the CapCut logo at the end of the video?
- 7 Pros
- 8 Cons
- 9 FAQs
- 10 Conclusion
What are Transitions?
Add transitions in CapCut is a technique used in video editing apps, especially in CapCut apk. It is used to connect one video clip with another one that can help the viewers to better understand the story or intent of your videos. Transitions are like the effects and filters which are also available in other video editing apps but CapCut has unique and up-to-date transitions that can raise your videos to the next level. CapCut also introduce its new feature in which you can add captions in video.
Why to add Transitions in CapCut?
We can add transitions in CapCut just for to achieve the following goals.
- To add visual interest to the video even though it is a lengthy video.
- To differentiate between flashback and storyline video parts.
- To differentiate the multiple scenes of the video.
- To introduce the new character in your video.
- To increase the excitement or suspense in the specific part of the video.
Types of transitions in CapCut
CapCut offers a lot of transition effects that are incredible but here we explain the popular transitions such as:
| Type | Uses |
|---|---|
| Wipe | Used at scene-changing points where the first image is replaced with the second image. |
| Push | Used to push the first image at the side of the screen and the second image suddenly appears. |
| Slide | Used when the first image is down/off and the second image is highlighted to show. |
| Fade | Used to black or white the image color when about to change the scene. |
| Cross dissolve | Used where the first image fades out while the second image fades in. |
How to add transitions?
CapCut has been the top trending video editing app for the last few years just because of its tremendous features and user-friendly interface. Here is the complete guide about how to add transitions in CapCut.
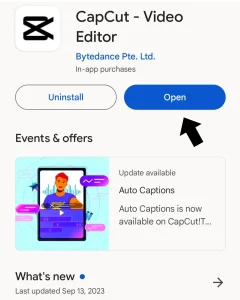
Step-1: Download CupCut apk
- If you don’t have CapCut apk then install CapCut app and launch it.
- If you have an old version of CapCut then you must have to update it first before adding transition effects in CapCut.
- Open the CapCut app on your device.
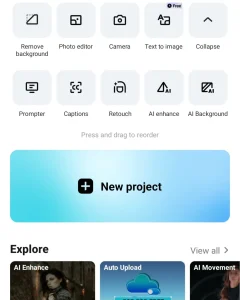
Step-2: Create a new project
- After launching the CapCut app, tap the “New project” button.
- Here you can upload your media file.
Step-3: Add your video
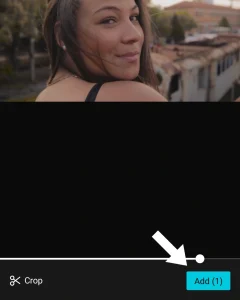
- Select the video on which you want to add transitions in CapCut.
- Tap on the “add” button located at the bottom right corner of the screen to add transitions in CapCut.
- By clicking here, your video will be added to the CapCut timeline.

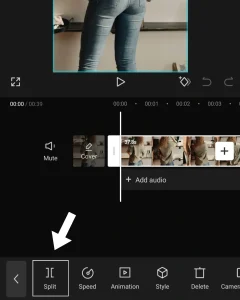
Step-4: Split the video
- Select your video and split it into multiple parts according to the size of the video.
- Tap on the “split” button and split it into two parts.
- Again select your video repeat the same process and split your video into multiple parts to add transitions in CapCut.
Step-5: Select “|” icon
- Tap on the “|” icon available on the video’s timeline.
- Tap on it and add transitions in CapCut
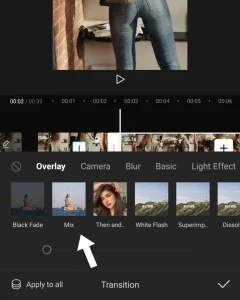
Step-6: Select the transition effect
- Here, you will see multiple transition effects.
- Select one of your favorite transition effects that you want to apply.
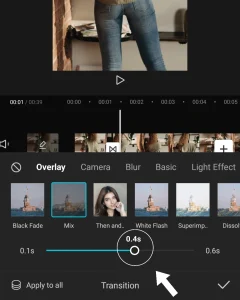
Step-7: Adjust the intensity of the transition
- Here, you have already selected your favorite effect to add transitions in CapCut.
- Adjust its intensity level of transition effect according to the video.
- The recommended transition intensity is 0.4 sec which is perfect for all types of videos.
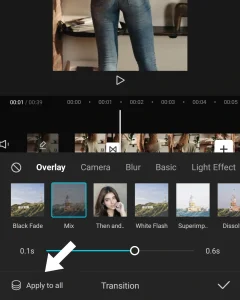
Step-8: Apply transition to all video
- After adjusting the intensity of the transition effect, apply it to your entire video.
- For this, just tap on the “Apply to all” button.
- This button is available at the bottom right corner of your device screen.
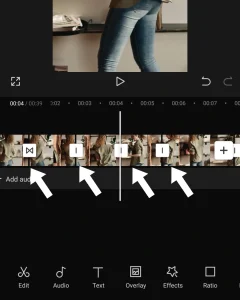
Step-9: Multiple splitting
- If you don’t like the same transition effect for the whole video and want to apply different transition effects then split your video multiple times.
- Repeat the above process which is “applying transition effects” and “adjusting its intensity”.
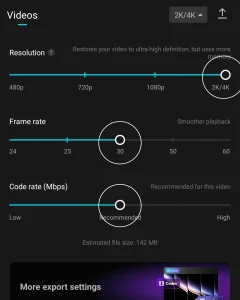
Step-10 Check the resolution of the video
- If you have all done it successfully, now check the resolution, frame rate, and code rate.
- The recommended resolution is 2k/4k, the frame rate is 30, and the code rate is recommended (medium).
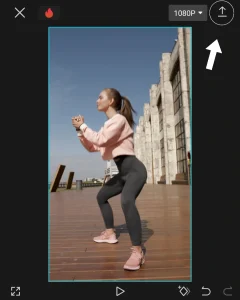
Step-11: Export your video
- If you edited your video successfully, now it’s time to save your video.
- Tap on the export “↑” button and save your video to your device.
- CapCut also provides direct sharing of your video to TikTok and other social media platforms.

How to add animated transitions in CapCut?
Although basic transition effects of CapCut are amazing, CapCut also provides the animated transition effects which are more attractive and beautiful than to add transitions in CapCut. Here, we will help you to better understand how you can add animated transitions in CapCut.
Step-1: Open CapCut and add video
- Open the CapCut app and select the video on which you want to add transitions in CapCut.
- Add your video to the timeline of CapCut.

Step-2: Go to the animations
- Select the video and tap on the “animation” button.
- Here, you will see a wide range of animated transitions.

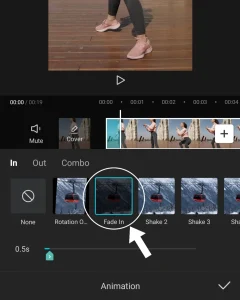
Step-3: Select the animation type
- Here, you will see three types of animations; In, Out and Combo.
- Select one of your favorite but recommended is “In” type animations.

Step-4: Select animation transition effect
- Here, you will have a wide range of animated transition effects.
- Select one of the transition effects which you want to add transitions in CapCut.
- Recommended transition effect is “Fade in”.
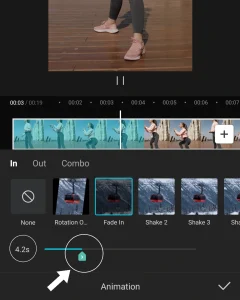
Step-5: Adjust the time of animated transition effect
- Adjust the timing/intensity of the animated transition effect as you want.
- Recommended intensity is 2.7s which is perfect for all types of videos.
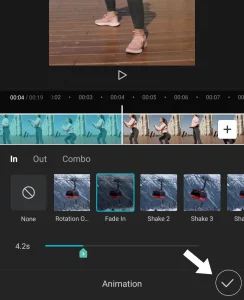
Step-6: Apply it to all video
- If you have selected the effect and intensity of transitions, apply it to your video.
- For applying, just tap on the “✓” button available on the bottom right corner of your screen.
Step-7: Save your video
- Here, you add transitions in CapCut successfully, you can save your video on your device.
- For this purpose, just tap on the export button.
Animation types and its transitions effects
| IN type Transitions | OUT type Transitions | COMBO type Transitions |
|---|---|---|
| Rotation Opening | Rotation Closing | Slide and wave |
| Fade In | Fade Out | Pane Left |
| Shake 1 | Rotate Out 1 | Pan Right |
| Shake 2 | Rotate Out 2 | Fall Left |
| Shake 3 | Zoom In | Fall Right |
| Rock Vertically | Zoom Out | Slice & Rotate |
| Rock Horizontally | Mini Zoom | Pendulum 1 |
| Spin Left | Slide Right | Pendulum 2 |
| Roll Right | Slide Left | Distort Left |
| Shake Down | Slide Up | Distort Right |
| Swing | Slide Down | Wobble |
| Wiper | Rotate | Bounce 1 |
| Blinds | Whirl | Sway In |
How to remove the CapCut logo at the end of the video?
When you have done all of the editing of your specific video and are going to export it or you have already exported your videos but after that, you check the CapCut logo at the ending part of the video. This branding is no doubt an annoying thing for all users because no one wants to like the Logo of CapCut at the end of the video. If you are also facing the same problem and now want to know how to delete this logo then follow these guidelines step by step to solve this issue.
Step-1: Open CapCut and add your video
- Install and open the latest version of CapCut.
- Add your desired video of which you want to delete the ending CapCut logo.
Step-2: Go to the end of the video
- Select the video in the timeline of the CapCut.
- Scroll left the video and move towards the end of the video.

Step-3: Select the ending of the video
- At the end of the video, you will see a separate video portion named “Ending”.
- This is the branding logo of CapCut. Select this portion and delete this.
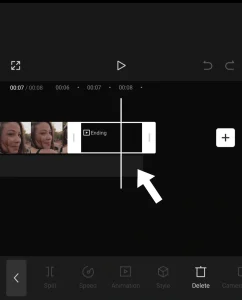
Step-4: Delete CapCut ending logo
- After selecting the ending portion, just tap on the “delete” button available at the bottom right corner of the screen.
- By using this method, the CapCut branding logo will be permanently deleted from your video.
Step-5: Save your video
- When you have successfully deleted your ending logo, you can save your video on your device.
- For this, just click on the export button as shown in the following picture.

Pros and Cons
No doubt, CapCut transition is a unique feature of CapCut but it has both positive and negative aspects such as:
Pros
- User-friendly interface.
- Multiple transition effects
- Animated transition effects
- Easy to customize.
Cons
- Generic look.
- Can increase the size of the video.
- Multiple splitting can decrease the quality of the video.
Watch the “Video tutorial” below to add transitions in CapCut.
FAQs
Q: Can I customize the transition?
A: Yes, you can customize the transitions as you want because CapCut provides a wide range of transition effects and many more features.
Q: How do I delete a transition?
A: For deleting the transitions, just select the transition icon “|” and tap on delete button.
Q: How do I add multiple transitions to a video?
A: You can add multiple transitions to a single video. after adding first transition, scroll left the video and again tap on the split button.
Conclusion
CapCut transition is a game-changing feature offered by the CapCut app free of cost. It is an incredible feature that helps you to create a scene-changing moment in your videos. Its popularity is increasing day by day just because it also offers all premium features without paying any charges.
Its user-friendly interface makes it more attractive and increases its popularity. I highly recommend you that use the CapCut at least once and try its transition effects. You will love your editing after seeing your results.