
Are your videos not clear and blur? And people’s tells you to convert normal video to 4k or buy an expensive camera. I have a free solution through you can convert normal video to 4K. It is frustrating for you and your viewers. High video quality always matters if you make any type of video. 4K video create a positive impact on users. It enhances user engagement and users like to watch and spend time on it.

Users appreciate the video because of its quality and feel comfort to see everything. If you also want to impress your viewers and to get high audience retention then convert normal video to 4K that looks professional. In this article, we will guide how to increase video quality in CapCut PC and Mac.
Table of Contents
- 1 Key Elements For Making 4K Video
- 2 How To Convert Normal Video To 4K Video?
- 2.1 Step-1: Click on new project
- 2.2 Step-2: Import Video
- 2.3 Step-3: Bring video to timeline
- 2.4 Step-4: Click on Video effects
- 2.5 Step-6: Tap on Lens
- 2.6 Step-7: Adjust the blur
- 2.7 Step-8: Export video
- 2.8 Step-9: Adjust neon effect
- 2.9 Step-10: Delete all clips
- 2.10 Step-11: Add color burn
- 2.11 Step-12: Add adjustment
- 2.12 Step-13: Settings on adjustment
- 2.13 Step-14: Set frame rate and export
- 3 FAQs
- 4 Conclusion
Key Elements For Making 4K Video
CapCut has a lots of features that enhances your video quality.
1) Editing tool
Recording on a good-quality camera always matters, but even if it’s recorded on a normal camera, a good editing tool can make it look just as good. CapCut has multiple tools to convert normal video to 4k. This tool offers multiple features for making your videos look their best.
2) Color Correction
In CapCut color correction is perfect. Enhance and adjust the color to a desired level. All of the color tools can convert normal video to 4k. Disturbing a color balance gives an unnatural look, loss of detailing, and loss of audience interest.
3) Resolution and frame rate
The clarity and smoothness of your video are affected by its resolution and frame rate. For many videos, a resolution of 1080p and a frame rate of 30 frames per second is a good starting point. CapCut provides the above from this upto 4k
4) Choose the right effects and filters
These things give extra style to your video and make it more attractive and unique. CapCut effects and filters are magic for the videos. CapCut provides updated effects and filters for transforming your video. Gender swap filter is one of the most famous filter of CapCut.
5) Graphics Card
It is the edge for color correction in video editing. It helps CapCut work faster and quickly fix the colors. It makes your video shine and is fantastic.
How To Convert Normal Video To 4K Video?
It is easy to convert normal video to 4k. After doing these steps your video convert into 4K video. We only do editing on CapCut PC because Windows CapCut provide multiple features besides mobile for converting low quality into 4K video. Here is step by step guide below in detail.
Step-1: Click on new project
- CapCut apk download from the playstore or apple store.
- Click on new project.

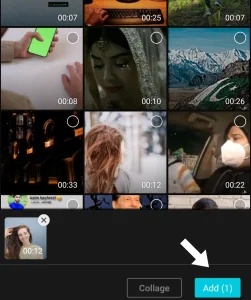
Step-2: Import Video
- Click on import button as seen in picture.
- Import your video from device.
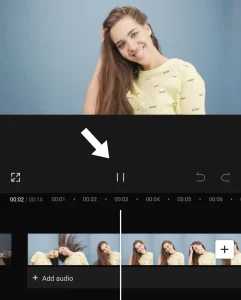
Step-3: Bring video to timeline
- Hover on added clip and drag the clip below.
- This will bring your file in to timeline.
- Play your video in the timeline.
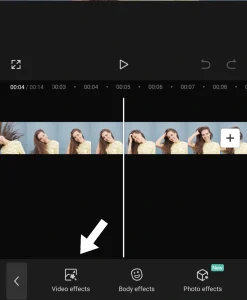
Step-4: Click on Video effects
- Click on the effects on upper side of tools menu.
- Next click on video effects and after scroll down click on comic.
- Go to Effects > Video Effects > Comics
Step-6: Tap on Lens
- Add black and white sketch from comics and drag it into timeline.
- Adjust the comic effects duration same in length to video.
- Next go to video effects and tap on Lens option.

Step-7: Adjust the blur
- Click on blur and adjust the blur 50.
- Blur setting is appear on top right side of screen.

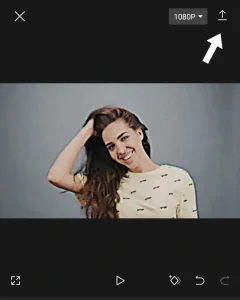
Step-8: Export video
- Click on export button to save the first clip.
- In export setting rename this first clip and save in 1080p and frame rate 30.
- Delete the BW sketch from timeline not delete the lens.
Step-9: Adjust neon effect
- Again go to Video effects > comic > neon.
- Adjust the neon effects scale at 50.
- Export the second clip and rename it clip 2.

Step-10: Delete all clips
- Delete and remove all of the clips from timeline and setting and empty the screen.
- Bring 3 clips in a time line original, first exported and second exported.
- And set the length equal of all of these.

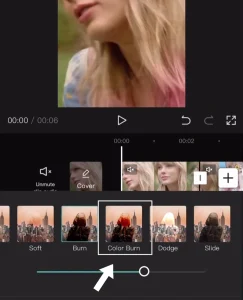
Step-11: Add color burn
- At the right side you see a layer option.
- First exported clip appear on layer 1 and second exported on layer 2.
- Click the first export clip basics and go to
- videos> Basic> blend>Mode>color burn
- Set the opacity on 30 by moving opacity scale.
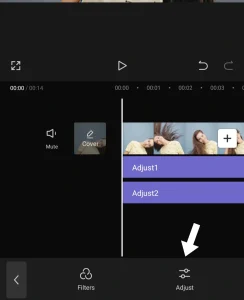
Step-12: Add adjustment
- Click on the second exported clip and again go to the same setting as we do on first
- Blend > mode > color > dodge
- This time set the opacity at 65.
- Add adjustment option.
- Click on adjustment and bring this on the timeline and adjust their duration same length for all clips.
- Make sure it comes at the top of all clips in the timeline.
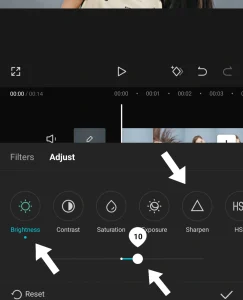
Step-13: Settings on adjustment
- We do some settings on this adjustment.
- All the settings of adjustment open on the right side of the screen above the timeline part.
- Adjust Brightness +10, Saturation +22 and Sharpness +22.
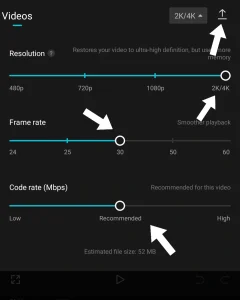
Step-14: Set frame rate and export
- Click on export and in the export setting rename the title resolution up to 4K and frame rate at 30fps.
- Your video is export to a desktop location and you will see the 4K video.
- You convert normal video to 4K successfully.
- Compare the original and final clip.
I hope you understand how to get hd quality on CapCut.
Watch the “Video Tutorial” below to Convert normal video to 4K video.
FAQs
Q: Is CapCut really convert low quality video to high quality video?
A: Yes, CapCut has feature to convert your poor quality video to 4K.
Q: Are there any pre-set filters that can improve video quality?
A: Yes, there are a lot of pre-set filters which improve the quality of your video.
Q: Is quality enhancing feature available on both android and IOS devices?
A: Yes, This amazing feature provide by CapCut available on both android and IOS devices.
Conclusion
Overall CapCut is the best editor for upscaling your videos. It provides a feature to convert normal video to 4K which is not available on other editing apps. You can use CapCut app to convert normal video to 4K.
Capcut has a free option, unlike other editors we do not need to pay the extra charges. You don’t need to spend hours on this just do it with little effort. Share them on social media to get a great response.
Also Read: