Do you want to make suspenseful and exciting videos that are noticeable to viewers and users? Then you should try latest feature velocity edit in CapCut. With this feature you create slow moving effects and time compression effects. By learning correctly you will be a master to do velocity edit in CapCut. In this article, I will completely teach you that how to add velocity in CapCut and discuss some of the different ways to use it.

The CapCut app is constantly improving and adding new features. This feature emerges from social media, CapCut also includes this. Many users hold this trend, and their videos have millions of views. I know you don’t know advanced editing skills and want to use this feature.
Table of Contents
- 1 What is CapCut Velocity?
- 2 Why CapCut for velocity edit?
- 3 Process Of Doing Velocity Edit in CapCut:
- 4 How to insert or remove the beats during velocity edit?
- 5 Tips for doing velocity edit in CapCut
- 6 How to do auto velocity in CapCut?
- 7 How to do reverse velocity edit in CapCut?
- 8 Typical mistakes to avoid while doing velocity edit in CapCut
- 9 FAQs
- 10 Conclusion
What is CapCut Velocity?
It is a feature offered by the CapCut app in its latest update. It is used to slow and fasten the video perfectly. Sometimes you want to slow down and faster video in CapCut at the same time but you are unable to do this. Velocity Edit in CapCut can do this work for you without paying any extra charges. If you want to speed up your video by edit velocity on CapCut then you can use Urban jungle CapCut Template to add your favorite jungle fonts and can apply forest styles on your videos.
Speed adjustment is the most common phenomenon used in video editing. When you speed up and slow down a video then the only thing that comes to your mind is that it may apply to your entire video but you don’t want to apply this to your entire video. Don’t worry, Velocity edit in CapCut is the only solution for your problem.
If you have a video of 30 seconds and want to slow down your video for the first 10 seconds then the next 10 seconds speed up and again the last 10 seconds can be slowed down. It can be done by velocity edit in CapCut. In this article, we will discuss how to do velocity edit in CapCut.
Why CapCut for velocity edit?
CapCut is the most comprehensive video editing app which is compatible with both android and IOS. It has multiple editing options which are not offered by other video editing apps. It has also a marvellous feature which is a velocity edit to control the speed of the video.
CapCut provides two features for speed control:
- Normal
- Curve
1) Normal
This feature automatically speeds up or speeds down the entire video. You can’t manually edit the speed of your video. This is also an amazing thing for you if you want to apply the same speed control adjustment on your whole video.
2) Curve
This feature enables you to manually control the speed of your video. It has more than 7 types of pre-designed speed control templates. These are:
- Custom
- Hero
- Montage
- Bullet
- Jump cut
- Flash in
- Flash out
All are pre-designed templates for controlling the speed of our video but “Custom” is the only option that allows you to manually adjust the speed of the video. By using this, you can adjust speed as you want.
Process Of Doing Velocity Edit in CapCut:
Before starting Velocity editing, you first download and install the latest version of the CapCut app from the Play Store or App Store. Here we will explain where is velocity in CapCut and how to add velocity on CapCut.
Step-1: Create the new project
- Install CapCut apk and open it.
- Click on “New Project”.

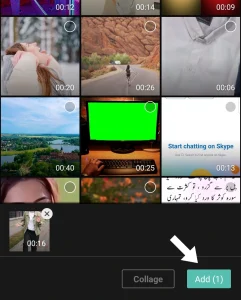
Step-2: Add media files
- Add clip from your gallery.
- You can either download them from social media or use your content.
Step-3: Split and delete extra video
- Split the extra or unwanted part of your video.
- Delete splited part from the video that you don’t want.

- Tap on the video and you see the second option speed.
- Than click on the “Normal” button.
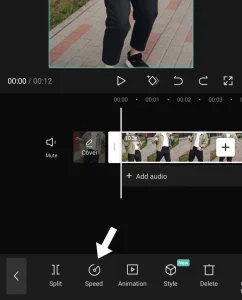
Step-5: Adjust the speed
- Make the speed 0.4x or 0.3x.
- Now, make it smoother and better quality.

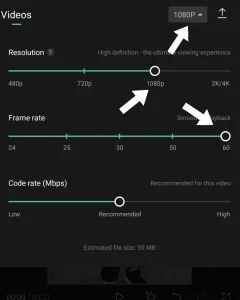
Step-6: Set frame rate and export video
- Set the frame rate at 60.
- Choose resolution according to your choice.
- Set the recommended code rate for better video quality and click on export (✓) option.
Step-7: Create a second project
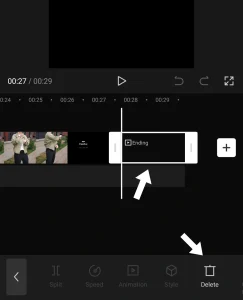
- Make a new project and select the video just saved.
- Delete the “Ending” of the video.
Step-8: Add audio in clip
- Add sound effects by clicking on “Add Audio” button than select the “Extracted” option.
- Audio and video clips should have the same length.

Step-9: Set the beats of video
- Splits the clip on the next yellow dot. This time don’t speed up.
- Than add the next and speed it up. Again repeat these steps.
- Click on “Beats” option.
- Now make a splits on the yellow dots. Select the clip in between the beats and speed it up as you want.
- Export your final results by click on(↑).
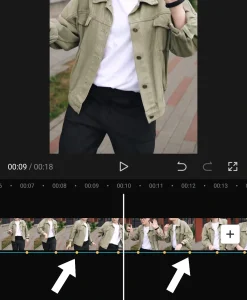
How to insert or remove the beats during velocity edit?
CapCut offers six beats while using velocity edit but you can add or delete several beats as you want.
1) Inserting Beats
You can add several beats during the velocity edit in CapCut. Select your video and tap on the added beat. Here, you will be able to add beats as many as you want.
2) Deleting Beats
You can delete beats as many as you want during velocity edit in CapCut. Select the video by just tapping on the video. Find the delete button located at the bottom right corner of your screen. Click on the delete beat. Your beat will be deleted. From this method, you can delete as many beats as you want.
Tips for doing velocity edit in CapCut
These are the best tips for you if you want velocity edit in CapCut.
- Always use the normal speed editing, it gives your video a more natural and realistic look.
- Use fade-in and fade-out to audio in a CapCut.It makes sound better and protects it from copyright.
- You must be smart in choosing music and beats that match your video’s velocity.
Watch the “Video tutorial” below to do velocity edit in CapCut.
How to do auto velocity in CapCut?
Auto velocity is a smart feature that automatically adds velocity in your video. This saves our time and eases the editing process. We don’t need to adjust the clips manually. CapCut has a built-in feature of auto velocity. CapCut adjust speed, video’s color, noise, stabilization, and timing.
Here are the following steps for auto velocity:
- Open CapCut and Click on “New Project”.
- Select the style menu under the bottom screen.
- This menu is shown by clicking on the selected part of the video.

Step-2: Find the auto velocity
- After scrolling in the menu.
- Choose the auto velocity option.
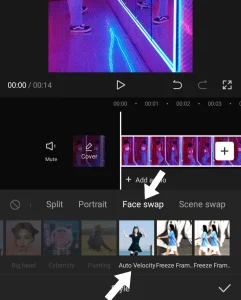
Step-3: Tune the speed and export video
- Adjust the speed between two intervals as you want.
- Again use fade in and fade out to make a smooth effect.
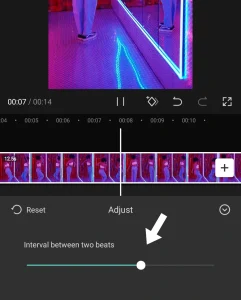
How to do reverse velocity edit in CapCut?
Step-1`: Choose reverse option
- Once you have imported a video in CapCut.
- select your video and click on the reverse option.
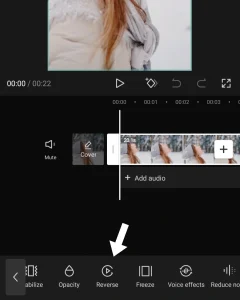
Step-2: Save reversed clip and again open same project
- Export this video and open this video in the same project.
- We again use this with a new clip.
- Select the cancel reverse by again hitting the reverse option.
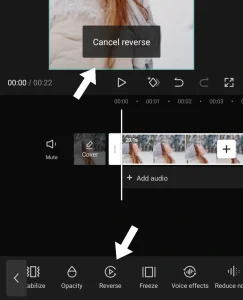
Step-3: Add second video
- Now click on plus icon and select the video which was exported which is the reversed video.
- Then select the both videos.

Step-4: Add auto velocity
- Select the first clip .
- Go to style ,select the velocity and then add the auto velocity feature.
- Next go to second clip again select auto velocity.
- Than Export the video.

.
Typical mistakes to avoid while doing velocity edit in CapCut
While doing velocity edit in CapCut, you have to avoid the following most common and important mistakes:
- Poor video quality
- Neglecting audio quality
- Ignoring branding
1) Poor video quality
Video quality is one of the most important things to notice while video editing. You have to use a high quality video for editing. Because, poor quality of videos can affect your audience. If you are using low quality video, after velocity edit, its quality will again lose. Therefore, we recommend that you always use the HD quality of your videos before editing. However, when you have all done and want to save your video, at that time, set your video quality in CapCut at 2k/4k.
2) Neglecting audio quality
The quality of audio track matters a lot in a top class video. But most of the people ignore this and just focus on their videos. They use irrelevant music tracks that most of the time are not suitable for your videos. Therefore, always use the relevant music tracks that are suitable for your videos. One more thing is that the quality of the audio track should be smooth and perfect.
3) Ignoring branding
When you are editing your videos, don’t forget your brand name to write it on your videos. This thing can save your videos from copyright issues. Therefore, you don’t have to neglect your branding which can make your videos more unique.
FAQs
Q: Can I reverse video through Velocity Edit in CapCut?
A: Yes, CapCut allows you to reverse your video by velocity edit.
Q: Can I apply the velocity edit to different parts of video?
A: Yes, you can use velocity edit to apply speed changes to different parts of video.
Q: Does velocity edit affect the video quality?
A: No, your video quality will remain same after using velocity edit effect. However extreme speed changes may reduces your video quality.
Conclusion
CapCut always brings something fresh and improved. It is the latest and golden feature of CapCut . Velocity edit in CapCut help to slow down, speed up, and create smooth transitions. Your videos become so energetic by the velocity that they will definitely be viewed by a massive audience.
Indeed this is effective for reel makers, song makers, and to add other good moments in your videos. The best output is gained by practicing more and more. Inshort Velocity edit in CapCut is stylish and wonderfull feature.
Also Read:
